Wednesday, December 19, 2018

Graphic Design Final

Projects

This semester, I created a plethora of projects that were extremely fun to produce. Some examples are my panorama and collage I created on Photoshop and my fall graphics and raccoon I created on Illustrator. My panorama was a collage of my splendid trip to Japan I took over the summer. The goal of this project was to blend pictures personally taken by the creator to make a seamless pan that looks like one whole picture, not multiple stitched together. This took me around 1 1/2 weeks to create because I kept being indecisive over what pictures I wanted to add to the panorama and how to make the transitions seem less abrupt. At this point, I was much better at managing photoshop; the magic wand tool and inverse keys were practically my best friends. Some other challenges I faced was how much of a picture I wanted to keep and what colors I wanted to be the focal point of this project. Along the way I learned the importance of masking and how much time it could save up. I also learned how to trick the eye into thinking multiple images are actually one. Towards the end, the only intense changes I made was the seamlessness of the images next to each. Overall, I'm very pleased at how much my skills in the graphic design department have grown!

I had a strong love hate (mostly hate) relationship when I started working on Illustrator. The first every graphic I created on this software was my raccoon. It took me around 1 1/2 weeks as well to create him. There were MANY challenges I faced. The first one was how I didn't know what tools to use or how to use them, even though I was following along with a pictorial. I kept rereading the steps, but felt like I was still going nowhere. Another challenge was how I unwary I was with how many layers I kept using and how I could've grouped them to save soooo much time. Along the way though, I started to understand the keys and what a tool was meant to be used for. Some feedback I received was to lessen the amount of layers I used and to smoothen my edges more to make him less pointy and cuter. My initial idea was to create a simple raccoon, maybe even make it Halloween themed. But because I was so fed up with Illustrator, after I completed the actual graded portion of this project I just added a "Congrats Yabi" celebration hat and some balloons to commemorate the end of my hardships.

Another one of my projects was the autumn graphics project. In this project, I had to follow along with a pictorial to create 9 autumn nut/leaf/berry graphics. Some challenges I faced was how to create  a decent looking maple leaf and how to make everything look clean and accurate to its original. Along the way, I learned how to use copying to my advantage and how to create clean curves with the anchor tool. Some feedback I was given was how aesthetically pleasing every graphic was placed and  how overall I did a good job. I didn't make any changes to my original idea since I was following along with specific instructions and didn't have as much freedom as I did with my other projects. All in all, I was and still am very happy with the outcome of this project.

How I Used My Class Time

In class, I used my time to work on projects I was assigned in this class and tried to help people if they needed an opinion or didn't know how to do something on a software; I also received help every time I asked for it. Any time I finished early (which was pretty rare, since I spent as much time as possible trying to perfect a project) I would start on the next project and/or scroll through Behance to see what the world has been up to lately. Outside of class, I ask what my friends in different hours are working on and ask for any tips and tricks they have for me that day. I also try to create ideas for future projects. Currently, I'm working on multiple logos for my dad's businesses.

Strengths

Some of my strengths as a graphic design student is how I can problem solve and get around challenges without asking for too much help. I also think I'm quite creative and come up with col concepts instead of doing the bare minimum. I believe I need to improve on my time management skills since I take a long time on each project I work on. I also need to work on my technical skills because I tend to make a lot of my pieces unintentionally pointy or use tools I shouldn't for a certain challenges.

Summary

I loved how much we got to be working and how there was always something to work on. I also enjoyed the videos we watched at the beginning of the semester because I learned a lot since I could work at my own pace and could rewind whenever I pleased. I also loved how we got to create Behance profiles and show the world our progression in this field. I genuinely wouldn't change a thing about this semester, since I moved every bit of it! Over this past semester, I learned how to use Photoshop and Illustrator and the similarities and differences between these two softwares. I'm so thankful for how much I learned this year, especially compared to last year!

Links

https://www.behance.net/happiyabief83

Monday, November 5, 2018

Watercolor Transfer Prints


First, I figured out what dimensions I had to change my model to so that it could fit beautifully onto my soon to be watercolored paper. After printing out a colored and black and white version, I carefully cut them out and went straight to the painting station. At the station, I imagined what my prints would look like on different backgrounds; would it look good with cool toned colors? What print should I associate this color scheme with? After hopping over those stumbling blocks, I whipped out the paintbrushes and got to it! I had a blast painting, especially because I was conversing with my friends as I was doing so. Once my papers were done drying, I yanked out the Mod Podge and started applying it onto my prints as I was told (apply it onto the inked side of the print, then gently place it on your watercolored paper and press it in with a squeegee). Later on, I shared a cup of water with my peers and dipped my hands into it. Why? Because the next step was to scrape off the paper of your prints so all that was left on your paper was the watercolor and the prints. Last but not least, Ms. Beaudoin was kind enough to go over my print with a clear substance that enhanced the colors of my prints an secured it into the paper.

Creating the prints was super fun! Though tedious (and slightly painful) I loved incorporating one of my previous photoshop projects into my latest project. One of my favorite parts of the process was figuring out what I wanted my color scheme to be and what style of painting I wanted to pursue. I think I did well painting, and wasn't the worst when it came to scraping off the excess paper in the end. I definitely struggled with what to do with each print (i.e Which one should I hang up? Should I do this with that? etc). Overall, I really enjoyed and learned a lot from this project!

Friday, September 14, 2018

Photoshop Challenge

For this challenge, the goal was to revamp this clean image of "Nature Man" (aka Jerid) by using blending modes, layer masks, adjustment layers, and whatever else you please. You could not, however, scratch out his face; his face MUST be visible. I was very happy that this challenge was overall open and I could pretty much do anything I want with it. When I first saw the image and the name given to it, I knew that I wanted to stay far from the palm of nature. I wanted to bring something new to the table, but didn't quite know what it would be. So, as I was scrolling through unsplash.com, I thought about what I did the in the previous class. That's when I had my "eureka!" moment. I instantly typed in words like "Italy,"  "Italian Churches," and "Renaissance" until I found a beautiful photo of some artwork based from the Sistine Chapel. I immediately inserted that picture into my photoshop layer and it all was history from their!
Like I said, I tried to keep the renaissance and holy vibe alive and for it to emit into the viewers mind. To do this, I made the color balance so that Jerid was as fair as Snow White and looked more like a statue rather than a human. On different layers, I added a paint esque filter and drew some tiny cracks all throughout his face. I also exchanged his dark suit for the previously stated Sistine Chapel picture, and the background for a painting created during the appropriate period. I was initially going to make his hair gradient into Italian architecture, but decided that it would seem overly edited and wouldn't fit nicely with the final piece. Going back to the holy feel, I attempted to insert a glowing effect so that Jerid could be seen as spiritual.

Overall, I once again learned so much through this challenge and am pleased with my end result. The ending wasn't what I 100% envisioned, but I definitely am proud of my work and can't wait to see what I could do in my next challenge! ☺❤

Tuesday, September 4, 2018

Adobe Photoshop Experience

Man oh man, was this assignment a journey. A time consuming but very needed one at that. What assignment you might ask? Well, in this assignment, you are given 6 folders filled with educational videos you had to follow along with the images you'll soon end up editing. The extremity of the assignments from easy to hard caught me off guard.

In the first video, I was taught how to use the handy content aware tool to get rid of unnecessary or distracting objects in the background. In the image given to me, the background was rather plain aside from the chair and backdrop. To get rid of these unwanted elements, you'd click the m key to select the marquee tool and drag it over the elements. Then you'd click delete and apply the content aware option. In the second image, the goal is to get rid of the logo largely displayed on a surfboard. In this case, the lasso tool did a better job than the marquee tool when it came to content aware. In the last image, I learned how to get rid of many unwanted background elements all at once by holding down the shift key and doing the previous procedures.

In the following video, I learned about the art of the patch tool and how to use it for your advantage. With this tool I was able to swiftly discard the debatably hideous graphic from a man's shirt. First, I made a tight selection around the unwanted area and used the patch tool to drag the logo away. Because the man's shirt had repetitive wrinkles and random light patches, I used this tool in even tighter and smaller areas so that the overall shirt looks realistic and not weird to the eye.

In the third video,  I learned how to incorporate the clone stamp and healing brush to get rid of a tag a woman accidentally left on her clothing. How exactly did I move it though? Well, I first created a two new layers. In the first layer, I selected an area of the garment with the clone stamp and brushed over the tag. I repeated this a couple of times so I didn't have one odd areas of the same dark color. Then, I painted over the new area with the healing brush so it could look more natural. Once I was happy with that, I created a new layer and added a grainy texture so the new area could flow better with the original image. And that's it!

In the video after that, I teamed up the clone stamp and patch tool to once again get rid of possible distractions from a background. In this case, it was a large pole that was behind a man's head. To get the finished result, I started off by selecting his head with the quick select tool and made sure it was an inverse selection. Then, I created a new layer. In that layer, I grabbed the clone stamp tool and dragged it over the distractions in the background. To blend out the harshness of the new area, I merged all my work together and, after selecting the area with the lasso, I used to patch tool to make the sky more even.

In the fifth video, I learned how to use the spot healing brush to diminish minor and major blemishes. The image I used to hone this skill was of a little boy who had dirt and freckles speckled over his smiling face. Using this brush was a tad tricky especially when you get to wider surfaces because the bigger the area, the rougher the spot healing brush blends the surface out which led to discoloration and inconsistencies.

Now, here comes the final boss: the sixth folder. Though those videos in kicked my butt, I came out wiser than ever. In this folder, there are six videos. The point of this mini assignment was to make a beautifully flowing collage of a model; two body profiles on each side of a gorgeous front shot. To make this a reality, I had to use all the tools I acquired in the previous videos and use them to the best of my ability so three images could become one. From getting rid of background distractions to extending the woman's sleeves, it seemed like finishing this assignment would never happen. There were so many little details I had to pay attention to and fix. But, through the inner tears and tantrums, I was able to get an end result I was proud of.

Overall, I really liked watching these videos and how hands on I could be during this experience. I definitely learned some new handy dandy tricks and look forward to learning even more!


Tuesday, May 22, 2018

Final Project Analysis


This has been one of the funnest projects I have ever done. To summarize what this assignment was, there were groups of 4-5 that consisted of people with various Myers-Briggs types so that each team could be balanced and would perform well. Once people were in their designated groups, everyone was getting down to business! The objective of this project was to create a product and be able to advertise, commercialize, and make graphic designs and a website for it. Since we started after Spring Break, this project took around 8 weeks to develop. 

Embrace Global's (my team's) product was called the LI; it stands for Language Interpreter. To sum up the point of the product, it's a pair of earbuds and glasses that can visually and audibly translate any language. It retails for $350.99 together. But, if some were to want only one aspect of this two-for-one deal, then they can purchase the items separately; the earpiece would cost $186.99 and the glasses would cost $172.99.

To showcase our design and how it's used, EG created a Romeo and Juliet spinoff where their families weren't the problem; their lack of understanding each other's mother tongue was. In the commercial, Juliet is given the LI earbud and can finally understand what her lover is saying. In the end, the lovebirds skip off into the distance to signify a happily ever after.

With our ads, Nandini, Steven, and I tried to incorporate our global feel into the outlay. We used colors like green and blue to give an earthy and inviting feel that would catch our audience's eyes. This also applies to what we were going for our website and graphic designs. We wanted to display a universal, sleek, and welcoming feel. 

Some challenges Embrace Global faced were creating the perfect logo that would strike our favored audience and creating the perfect commercial that would peek everyone's interest. Throughout this dilemma, however, everyone in the team was trying their best to progress and obtain results by stating their ideas and giving good criticism. Some critiquing my team gave me was on my advertisement; they told me it wasn't bad, but needed a little fixing up here and there. They helped me better my ad and get more comfortable using Adobe Premiere Pro, so I'm thankful to them. They also gave me their opinions on how I should shoot the commercial. Without their commentary, I believe my shots for the commercial wouldn't be as good as it turned out.


Overall, I think I did a pretty good job during 4th Quarter (especially compared to my grade during previous quarters). I did my work, made sure everyone was always included during each process we were in, and led the group into the direction we ended up on. I felt like the leader of a well oiled group that was ready to rumble! During class time, I was always working on something related to the Shark Tank project. If I was done with my given work, I would constantly check in on my fellow group members and see how I can either improve the work I've already done or lessen their work load. I always made sure EG was happy with my outcomes, and would go back to business if they wanted me to edit anything.


Outside of class, however, I never really went out of my way to do work except for the lunch prior to the day we were going to present and the morning of our presentation. My team and I never felt like we needed to meet up that often outside of class.


After one year, I really do believe that I can use my e-Communication skills in the world. Now, I see more of the beauty, creativity, and work put into animations, graphic designs, and even movies. I come up with better ideas for my own projects I hope to showcase in the future. Though I see my prowess expanding, I know there's definite room for improvement. I need to get better at using the programs given to us, and need to speak up more to the teachers when I'm confused or need help (I am
getting better at both of these problems though! I'm getting it now; slowly but surely!)
I loved how this quarter really made me think by creating any device I wanted and to work off of that. It gave me an infinite amount of options for product ideas and really pushed me to think outside the box. I'm quite pleased with the final outcome of our designs, but I would for sure change the website banner and the color scheming. To me, the banner and the website color scheming really threw off our initial "sleek and classy" feel. Next year, I plan on pushing myself once more to create a product by myself and/or with a group of friends and see if I can implement the last criticism I got for this project to the next. I'd like to see how far and how well I can make this future task turn out.

Thursday, March 8, 2018

Web Design ft. CARP

WEB DESIGN ft. CARP


Project Overview

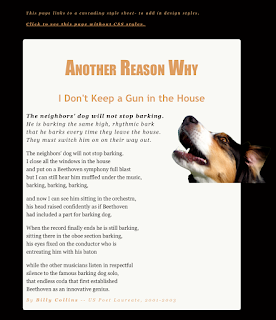
In this project, I revised a whole bland site with an interesting poem. The objective of this project was to notice the difference and impact simple things like font size, family, margin and padding size, and so much can change the overall feel of something and make it more appealing to the eye. Here's a rundown of what exactly I did to give this site transforming makeover!

Contrast

First change that was up was adding more colors to the site, and overall adding contrast. Contrast is a comparison of two or more things that shows a striking difference. The overall results of contrasts help see a new light on a topic, or a new perspective of something. Without contrast, an item can look very dull and bland, and won't have an intriguing impact on its viewer or listener, especially on a website, Everything would look too messy and jumbled together, the audience most likely wouldn't bother trying to decipher or understand what's going on or what the idea is supposed to be. So, to add contrast to this site, I made sure everything was in color; the color scheme being the dog on the right of the poem. Not overusing these colors or add any other out of place colors adds a sense of unity and balance. Contrast isn't only adding color; font size and style counts! Bigger and bolder fonts are the first things eyes will go to because they sense that the bigger and bolder fonts are more important to the smaller ones. This also separates titles from the text body, and headings from captions. It puts everything in order, and helps the viewer flow through everything like a breeze.


Alignment

Alignment is very, very, VERY important! It's the same to contrast in the way that everything can look jumbled and gross if everything is the same. Having the picture, title, poem, EVERYTHING aligned to the left once again makes important things look not important, and doesn't let the full message send through. It's simply not appealing, and looks sloppy. So, having the poem be left aligned, the picture of the dog on the right, and the Title in the center makes everything look pristine.


Repetition

Repetition is the act of repeating something that was already done previously. For instance, For instance, For instance; catch my drift? Adding repetition, when done in a certain way, can help adding unity. In this project, I repeated the font family Georgia, and the colors of important text that I want future viewers to notice.

Proximity

According to the handy dandy website google, proximity is the relationship of the nearness of space of time. In this project, I incorporated proximity through changing the size of the margins and padding. This helps add to the piece because it groups the important stuff together and makes certain text the centerpiece.


Conclusion 

Overall, through constant trial and error, I loved this project! I've always been intrigued over how much effort it takes to make and design websites, so really being in front of the screen and attempting to redesign a bland site was super super fun! Of course, I had Mrs. Zimmerli and my friends to help me through my brain farting moments, which did speed up the process. I know that I will take a lot from this project, especially in the future! :)

Monday, March 5, 2018

Point A to Point B Project Analysis


    1. This project was extraordinarily fun to be a part of! It was the first project where I could be behind the camera and kind of direct the production as it went on. I also got quicker at editing (though my computer wasn't cooperating; what's new). So, lets start at the beginning. Me, Jaden, Julia, and Nandini quickly assigned each other our roles; I was the cameraman, Julia was the director, Jaden was the art/location finder, and Nandini was the actress. With this indestructible team, the whole project would be a breeze, right? Well, wrong in a way. Even though I was in a bomb team, trying to battle against 
      lighting and passerby's was exhausting and a tad infuriating. Also, figuring out how to use the tripod on my own was T-R-I-C-K-Y. It took me a while to make sure that my camera wasn't slanted and that it was on correctly. Once I started to get the gist of using the tripod, I started to pay more attention to the types of shots I was taking and how well they would transition in the future when I edited my clips in Premiere. Once we were done filming, we ran back and entered stage 3: the editing process. Maaaaan oh man, slicing chunks of what I thought were valuable pieces to the story was saddening. But it had to be done. I thought doing a 60 second project would be easier. It. Isn't. Finding the perfect song to go with the film was also a long journey. But, after alllll of that, I am very pleased with each and every outcome of it. My team did a really good job, and we were always hustling. I'm proud of my team :)))!!!!!

Tuesday, February 27, 2018

My Personality Type


My Personality Type 

I think the personality type I was assigned is near perfect. I for sure believe that I get my energy through social interactions, rather than munching on chips alone on my spine breaking couch. And, even though I do think many things through, I am way more of an intuitive person than one who believes that every little thing in life has to be planned out and has a specific reason for existing. Also, I trust my gut feeling more than I do anything else. Oh, and I definitely am not a judgmental person 24/7. I perceive before coming up with my final thoughts about something someone. 
I do think that my personality description helps me grasp onto a better understanding about why I do specific things or feel more than others do, and get a rush when I get to hang out with my friends. Knowing that I'm an ENFP also makes the specific occupations I gravitate to so much clearer. There are so many things I'd love to do n the future, like being a professor, singer, actress, author, traveler, and so much more. I also lean towards jobs where I can constantly be around people and be an adventurer. Thinking about me working a desk job and barely talking sounds like torture. 
I feel that when I'm assigned a role that matches up up with my personality type I work waaaay better. Of course, being an ENFP means that I can adapt to anything (which is true), but I still associate with leader type roles over one where I have to constantly be the quiet and take on every little task I believe won't benefit my team. I fancy being able to lead, but also listening to what each and every member thinks and would like to do. 
There are many people in the world that low-key make me want to ram my head into a wall constantly because I just don't agree with the way they function or our interactions are too negative/cringey for me to handle. Like introverted people whodunit even TRY to communicate their thoughts to you, or contribute anything at all. I mean, I understand that they're introverted and that's why they probably don't try as much, but it still hurts my soul. Oh, I ESPECIALLY despise very "sophisticated" people that act like their 1023919409374023947 ranks above you on the little social caste they created in their head. Also, people that need each and every little thing to be planned out, are afraid of change, and/or never listen. All these kinds of people rustle my jimmies. 
To be honest, I didn't learn tooo much because I knew my personality type prior to taking the test again in class. But, taking the test for the bajillionth time does reaffirm my constantly energetic mood and vibes that I radiate off.  

FUN FACT: I have the same personality type as Walt Disney, Dr. Suess, and Robin Williams! :)

Lion/Otter/Beaver/Golden Retriever

My results for the Lion/Otter/Beaver/Golden Retriever exercise weren't really surprising. Turns out that I am 50% Lion and 50% Otter, which is pretty cool in its own way. Guess you could say that I'm a Lotter! Though I'm not surprised with my outcome, I am pleased with it. I certainly do love leading like a lion, and being a happy-go-lucky figure like an otter.

Sunday, February 4, 2018

How to Print Project

How to Print Project


The creative process for this project was rather quick. Me and Jaden quickly decided who would be the cameraman and the muse. Figuring out the script and storyboarding were also quick processes. As the muse, I didn't really do much aside from doing what I was directed to do.
Though I was pleased with the overall result, there's a lot about the process that I would change. For starters, I now would want to shoot the video in the library rather than the e9 room because the lighting in the later room is kind of iffy (especially because of the yellow tinted light source in the back of the class) and because the environment of the library has much more colors and an overall refreshing feel. Another thing I would change is the perspective of our shots, which I feel lacked much creativity and was just boring in general. Along with that, I would like to get more focused shots of myself, because in some scenes the focal point wasn't actually me (i.e the scene where I'm on the very left and Jaidyn in the the right and closer to the camera and not as blurred out as me. Though our camera work was poor and wobbly at times, I'm giving me and Jaden a slide because our tripod wasn't cooperating with us. Though there were many faults within this piece, there were many aspects that I liked. For instance, me and Jaden were in a room where we had to fight against the light sources so that at least most scenes would have the same tint of color. Also, we got our story across.
Some experiences that I would draw from to enhance my next project is the whole editing process and shooting process. Through these procedures, I learned what to do to make future shots more stable and smooth, how to battle unkind light sources, how to edit out some errors, how to add more flavor to certain shots, and how to tell your story through perspective. Overall, I thought that this project was very informative and fun! I learned a lot and can't wait to make my future projects even better!